配列の使用
◇配列の代入
宣言した定数に[]と,区切りで要素を追加する
const hoge = ['fuga1', 'fuga2', 'fuga3'];
◇インデックス番号
0始まりで番号が振られる
const hoge = ['fuga1', 'fuga2', 'fuga3'];
こちらの例だとfuga1のインデックスは『0』でfuga3のインデックスは『2』になる
◇要素の取得
配列に[]でインデックス番号を指定することで取得できる
const hoge = ['fuga1', 'fuga2', 'fuga3'];
console.log(hoge[0]); //fuga1が出力される
テンプレートリテラル
文字列の中に定数や変数を埋め込むことができるもよう
バッククォーテーション(`)と${ }を使う
const name = "田中太郎";

console.log(`名前は、${name}です`);
名前は、田中太郎です
バッククォーテーションで囲むの忘れそう
React Nativeのprops書き方
React Nativeの公式ベースでみてみた
Learn the Basics · React Native
import React from 'react';
import { Text, View, StyleSheet } from 'react-native';

const styles = StyleSheet.create({
  center: {
    alignItems: 'center'
  }
})

const Greeting = (props) => {
  return (
    <View style={[styles.center, {top: 50}]}>
      <Text>Hello {props.name}!</Text>
    </View>
  );
}

const LotsOfGreetings = () => {
  return (
    <View style={[styles.center, {top: 50}]}>
      <Greeting name='Rexxar' />
      <Greeting name='Jaina' />
      <Greeting name='Valeera' />
    </View>
  );
}

export default LotsOfGreetings;
expoで動かすとこうなる

LotsOfGreetingsのGreetingに指定したnameがGreetingにプロパティで渡される
Greetingは受け取ったpropsの中のnameを取り出してHelloと結合して表示する流れのよう
わりとわかりやすいので良い
リンク
技術ブログを書く方法
引用でコード書くのもなんかなぁと思ったので調べてみることに
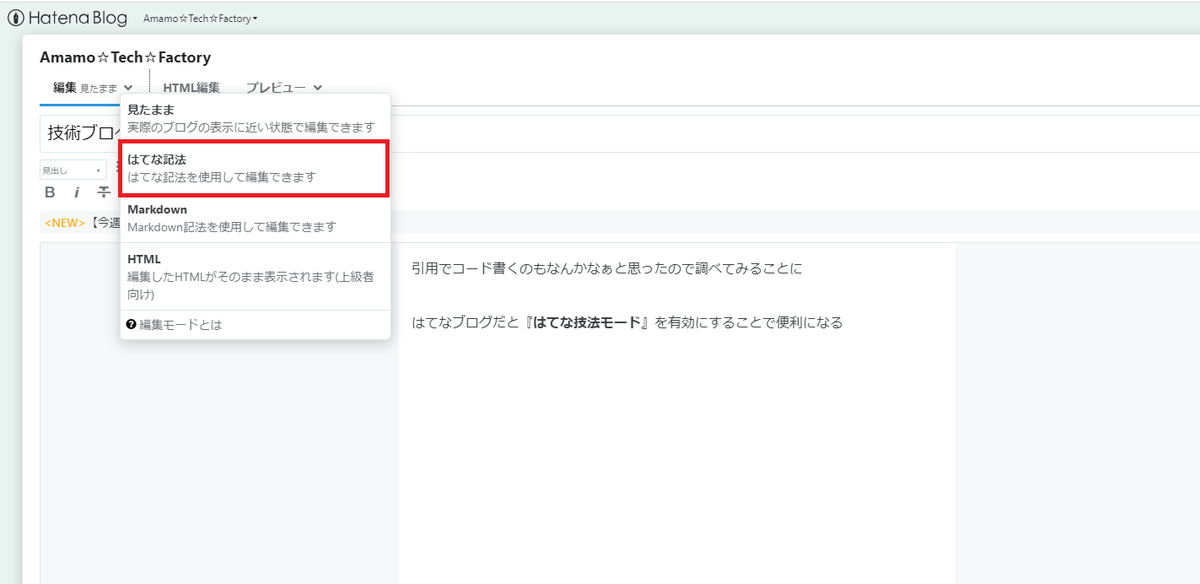
はてなブログだと『はてな記法モード』を有効にすることで便利になる
こちらにあったの『見たまま』→『はてな記法』に変更する
設定が有効になったらコードを">||" "||<" で囲うと…
import { StatusBar } from 'expo-status-bar';
import React from 'react';
import { StyleSheet, Text, View } from 'react-native';

export default function App() {
  return (
    <View style={styles.container}>
      <Text>Open up App.tsx to start working on your app!</Text>
      <StatusBar style="auto" />
    </View>
  );
}

const styles = StyleSheet.create({
  container: {
    flex: 1,
    backgroundColor: '#fff',
    alignItems: 'center',
    justifyContent: 'center',
  },
});
それっぽくなりました!
さらに">|[言語名]|"にすると指定した言語で色わけしてくれます。
import { StatusBar } from 'expo-status-bar';
import React from 'react';
import { StyleSheet, Text, View } from 'react-native';

export default function App() {
  return (
    <View style={styles.container}>
      <Text>Open up App.tsx to start working on your app!</Text>
      <StatusBar style="auto" />
    </View>
  );
}

const styles = StyleSheet.create({
  container: {
    flex: 1,
    backgroundColor: '#fff',
    alignItems: 'center',
    justifyContent: 'center',
  },
});
形がそれっぽくなるだけでやる気でますね
リンク
Expo initでスクリプトの実行が無効と出る
Windowsでexpoのプロジェクトを作成しようとしたときに発生したのでメモ。
カテゴリ的にはPowerShellの問題となる。
expo : このシステムではスクリプトの実行が無効になっているため、ファイル C:\Users\xxxx\AppData\Roaming\npm\expo.ps1 を
読み込むことができません。詳細については、「about_Execution_Policies」(https://go.microsoft.com/fwlink/?LinkID=135170)
を参照してください。
発生場所 行:1 文字:1
+ expo init xxx
+ ~~~~
+ CategoryInfo : セキュリティ エラー: (: ) []、PSSecurityException
+ FullyQualifiedErrorId : UnauthorizedAccess
初期状態のままだと実行できないようなので実行ポリシーを変更する。
PowerShellを管理者として実行して下記を実行。
PS C:\WINDOWS\system32> Set-ExecutionPolicy -ExecutionPolicy RemoteSigned
そうすると以下の文言がでるので『Y』でEnter
実行ポリシーの変更
実行ポリシーは、信頼されていないスクリプトからの保護に役立ちます。実行ポリシーを変更すると、about_Execution_Policies
のヘルプ トピック (https://go.microsoft.com/fwlink/?LinkID=135170)
で説明されているセキュリティ上の危険にさらされる可能性があります。実行ポリシーを変更しますか?
[Y] はい(Y) [A] すべて続行(A) [N] いいえ(N) [L] すべて無視(L) [S] 中断(S) [?] ヘルプ (既定値は "N"): y
晴れてExpo initができるようになる。


Error: Problem validating fields in app.json
React Nativeの講座をUdemyで学んでいたときに発生したエラー。
Expo Developer Tools には以下の表示が出ていた。
Error: Problem validating fields in app.json. See https://docs.expo.io/workflow/configration/
・should Not have additional property 'exxtra'
どっからどう見てもextraの綴りミスでしょ…
ということでapp.jsonのをextraに修正したら直りました。
ブログ始めてからは些細なエラーでも発生してくれたほうが書けるからいい!
リンク
FirebaseSDKのセットアップ
FirebaseとExpoを先日触ったので備忘録です。
本手順ではExpoを使用した場合を想定しています。
[公式Document]
ExpoにFirebaseをインストールする
以下のコマンドを入力します。
expo install firebase
API Keyの設定
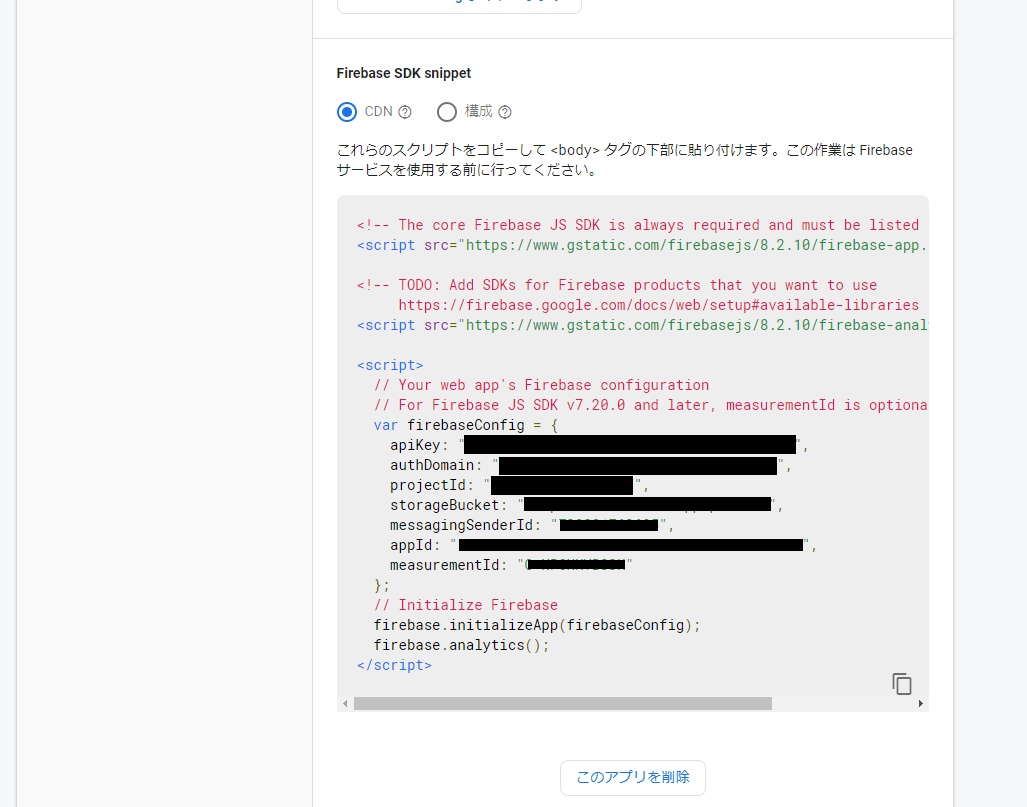
Api keyを設定して初期化します。
import * as firebase from 'firebase';

// Optionally import the services that you want to use
//import "firebase/auth";
//import "firebase/database";
//import "firebase/firestore";
//import "firebase/functions";
//import "firebase/storage";

// Initialize Firebase
const firebaseConfig = {
  apiKey: 'api-key',
  authDomain: 'project-id.firebaseapp.com',
  databaseURL: 'https://project-id.firebaseio.com',
  projectId: 'project-id',
  storageBucket: 'project-id.appspot.com',
  messagingSenderId: 'sender-id',
  appId: 'app-id',
  measurementId: 'G-measurement-id',
};

firebase.initializeApp(firebaseConfig);
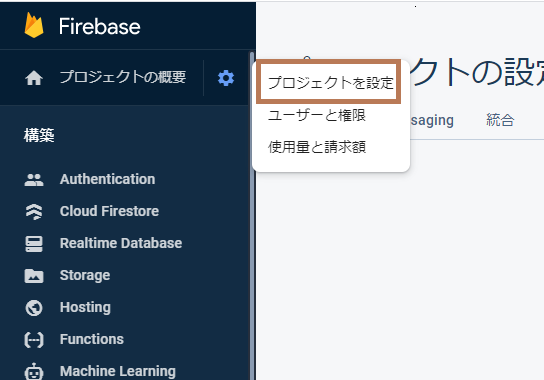
使用するkeyはfirebaseのプロジェクト設定から確認できます
リンク